How to Remove a Stripped Screw

![]()
Dremel or Drill

One quick fix is to take a dremel and cut a line from one end of the screw head to the other. The idea is to create a gash that will be deep and wide enough to support a flat head screwdriver. You can then use the screwdriver normally and hopefully loosen the screw. You can also take a drill and cut a small hole in the center that is just deep and wide enough to fit the top portion of a phillips head screwdriver. In many cases, this can create just enough room for the screwdriver to grip the hole and enable you to loosen the screw. The trick is to exert some downward pressure as you twist the screwdriver in order to produce maximum grip.
![]()
Rubber Band

Take a thick rubber band or a piece of similar material (even a balloon can come in handy) and place it over the screw. Hold it down with one hand as you place the screwdriver on top and exert downward pressure. The rubber band will provide a bit of adhesion that can give the screwdriver just enough grip to turn the stubborn screw. If you are not successful on your first attempt, fold the rubber over the screw a couple of times to produce more adhesion and try again.
![]()
Welding Adhesive
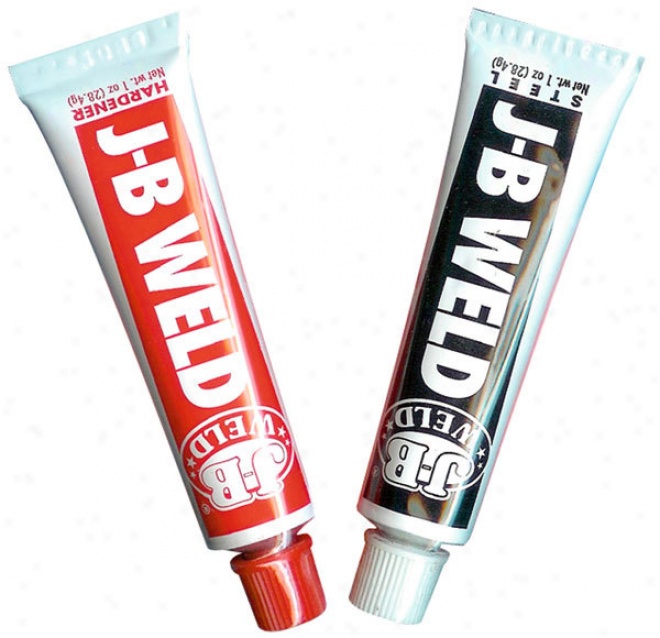
Welding adhesive is readily available at most home improvement stores, and you can apply some of the material to the top of the screw. Place a nut on top of the material before it sets and allow the material to harden. You now have a nut firmly affixed to the head of the screw, and chances are that you can use a pliers, socket or small wrench to use the nut to loosen the entire screw.
![]()
Needle Nose Pliers

This trick works wonders if you are dealing with a screw that has been partially removed before becoming stripped. Simply crimp the pliers around the head and try to loosen the screw. As long as you have sufficient space for the tip of the pliers to grip the screw, chances are that you will be able to loosen it as you twist. Just remember to apply a good amount of pressure while holding the pliers to maximize grip.
You can also cut off the head of the partially-exposed screw with a dremel just below the head. The idea is to keep as much of the exposed shaft of the screw intact as possible. Then, simply grip the shaft with the pliers, squeeze tightly and try to loosen the screw.
![]()
Tapping the Screw
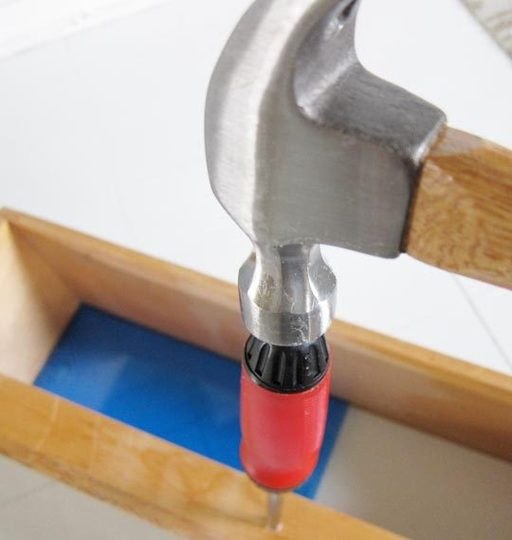
Take a hammer and gently tap the head of a phillips screwdriver into the top of the screw. You may be able to create just enough of an indentation for the teeth of the screwdriver to grip the screw. Exert downward pressure as you twist, and you may be able to get the screw loose.
You can also try to use a phillips screwdriver that is a little bit larger than the original screw hole. Use some downward pressure as you attempt to twist the screwdriver at the same time. There are times when this will provide just enough friction to allow you to loosen the screw.
If worse comes to worse, you can always take a hammer and thick nail or drill bit and tap it into the screw. Keep tapping until the screw gets pushed deeper into the hole and passes the point where it connects the two pieces of material together. This will force you to make a new screw hole adjacent to the original one, but it will allow you to free the item that you are trying to separate in most cases. You can also use a punch to accomplish the same thing.
You can also try and pry apart the pieces that you are trying to separate if they are not fragile. This may cause a little bit of damage and require you to make a new hole for a new screw when you reassemble the item, but it can get the job done. You can also cut off the section that is anchored by the screw so that the rest of the item but the area around the screw can be separated. You should be able to unscrew the remaining piece with some pliers or your hand or break it off if worse comes to worse.
Try these tricks out for yourself, and one of them should get the job done. Just be mindful of the fragility of the item that you are trying to separate. Using too much force or the wrong method for the can cause the entire piece to break. In any case, there is always more than one way to skin a cat, and chances are that one of these methods will work in your particular situation.
