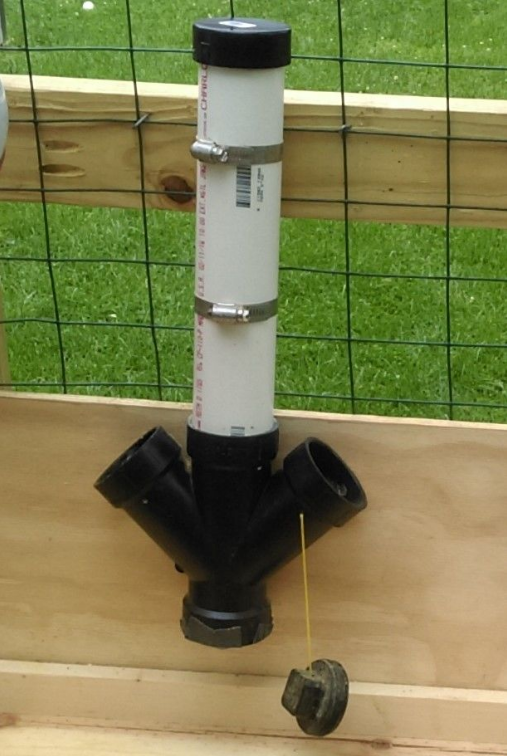
How to Make a Simple Chicken Feeder out of PVC Pipe
Using PVC pipe to build a rudimentary chicken feeder can be beneficial for a few reasons. First, it is more stable than funnel systems. Second, it is stronger and can do a better job of withstanding wind and rain. Finally, it can be very useful when it comes to keeping rodents and vermin out of the feeder. Let’s take a look at how easy it is to create and start using it for your chickens right away.
Required Items
1 length of 2” diameter PVC pipe
At least two clamps
1 “Y” or 45 degree angle PVC connector that is 2” diameter along with threads
1 cap for the top of the PVC pipe (2” diameter)
3 plugs for the bottom
3 threaded caps for the Y connector
Putting Everything Together
The length of the PVC pipe that you need will depend on how many chickens you have, how much they eat and how much space is available. Remember that this is a vertical feeding system. Attach the Y connector to the bottom end of the main PVC pipe and seal with epoxy. Screw in the caps to all three holes on the connector. Clamp the unit to the side wall of the chicken coop or feeding station, making sure that the holes on the connector are not too high above where the chickens will be standing.
All you need to do is fill the main pipe with the feed and cap it off. The feed will flow down through the unit and fill up the side holes of the Y connector. Remove the caps on the sides when the chickens are feeding and re-attach it once they are done.
Building a Feeding Station
You can also build a feeding station for the chickens that is customized for this particular feeder. Below are some basic guidelines, but you can also modify it to suit your needs if you wish.
Required Items
2 pieces of plywood that are around 1×2 feet each
4 pieces of 2′ long 2x4s
3 pieces of 1×2 wood for a guard around the edge of the platform
3 steel angle brackets
Screws and glue to secure everything together
The first step is to attach one of the plywood pieces against the back wall of your coop behind where the feeder will be situated. Then, connect the brackets to this piece so that you can join the other piece of plywood later. Put one on either side and the other in the middle of the bottom edge of the wall.
Next, take two of the 2×4 pieces and place them beneath the back wall and underneath the brackets. Secure them to the brackets. Next, measure and cut the 1×2 pieces of wood to fit along the front and sides of the other piece of plywood. Cut an additional 2-3 inches off of one of the side pieces. This will give you a space to scrape away debris and droppings when you clean the feeder later.
Screw in the front piece so that it rests on its side along the front of the plywood. Then, take both of the side pieces and secure them to the front piece as well as through the plywood beneath. The notch you’ve made earlier should be situated along the back.
Attach the two remaining pieces of 2×4 beneath the front of the plywood piece you’ve just assembled. Slide the plywood beneath the back wall atop the brackets and legs. You may need to make the front 2×4 pieces a little shorter to offset any alignment problems you have during this step. Secure the table and legs to the brackets and you’re good to go.
All you need to do now is to use or build a ladder so the chickens can climb up and enjoy the feeder. Just make sure that you space the rungs apart properly and ensure that the slope isn’t too steep for the chickens to climb. Use rounded pieces of wood or thick sticks for the rungs to make it easy for the chickens to grasp with their feet as they climb.
Try this out for yourself and see how this simple system can make feeding your chickens easier, less-messy while producing less waste. It will also be elevated and secure enough to discourage rodents and other pests from trying to get into the feeder. Feel free to modify and improve on this basic design, but following these basic principles can give you a finished product may be worth your time and effort.


