How to Make a Chair With Duct Tape
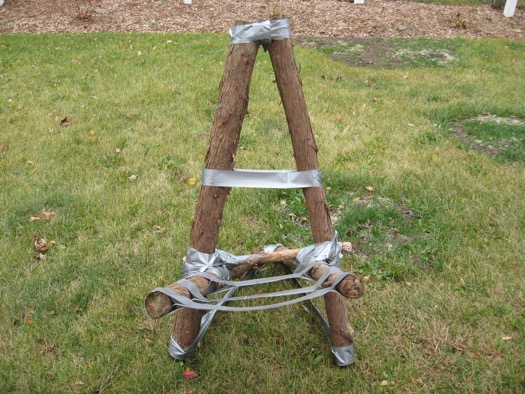
One of the things that you will most-likely miss during a bare-bones survival situation is a chair. It’s one of those things that we hardly ever think about, and incorporating a chair into our survival kits or bug out bags is not always that practical. Let’s take a look at a way that you can make a chair out of some duct tape and a few branches. You can apply the same principles and come up with a more customized option that can make life a lot easier during a crisis.
![]()
Getting Started
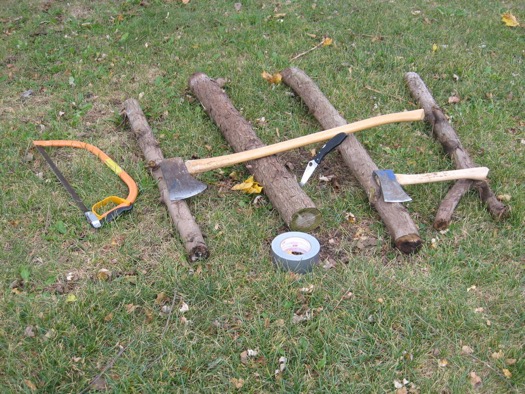
The first step is to gather a couple of long branches that are about 2 inches in diameter. They should be at least four feet long each, and this will serve as the backrest for the chair as well as part of the frame. You can make them shorter or longer depending on your preferences, but three feet seems to be a good starting point. Trim the branches so they don’t have twigs or other sharp parts that protrude from the sides.
You also want to gather two shorter branches that are also about 2 inches in diameter. Strip them of any protrusions as well. This will serve as the seat portion of the chair. It’s hard to say how long these pieces should be, and it will depend on the height of the person who will be using the chair once it’s finished. Generally speaking, both the back and seat should be about the same length, but you can improvise according to your needs as well. It’s also important that the branches for the seat, as well as the back, are thick and strong enough to support the weight of the person using the chair as well. Both sets of branches should be trimmed to be equal in length and have a similar diameter.
Finally, you will need a smaller branch that’s about 12-18 inches long and an inch in diameter. This will serve as a cross-support beam that will rest just above the seat.
![]()
Putting the Seat Together
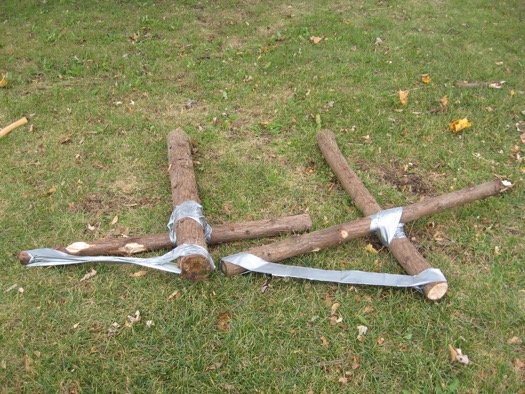
If you have long branches, you can make a cut in the middle that almost extends all the way through the wood. Leave just enough of the branch intact so you can bend it without causing it to break. This little bit of material can dramatically increase the strength and stability of the chair. However, if you only have shorter branches, you can simply tape the ends together for a suitable fitting.
In both cases, the object is to form a “V” shape with each set of branches and anchor them in place with the tape. Wrap each branch and then connect them while also looping the tape around the “bridge” to temporarily secure everything together. Just apply enough tape to hold the branches together for now. You can reinforce these connections later once the chair has been assembled, and this will help you to conserve on tape as well.
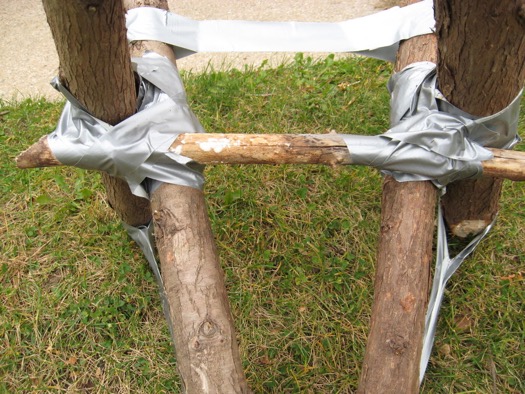
The next step is to tape the support beam to the larger V about ¼ the way up from the bottom. Then, place the smaller V inside and against the larger one so that it touches this support beam. Situate the V so that the pointed end extends back and down and serves as the third leg of the tripod that you are making. Tape this V to the support beam, as well as the legs of the back portion of the chair, to secure it in place. The front of the V will be your seat, so adjust how far it extends forward accordingly.
![]()
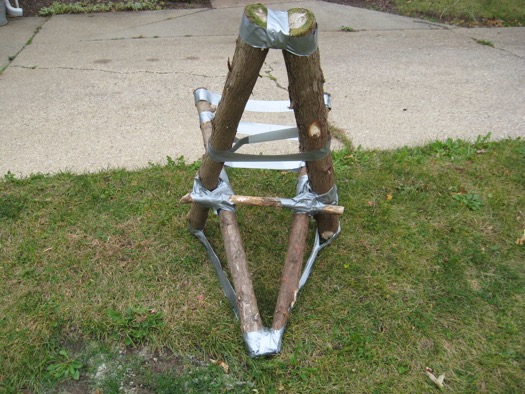
Securing the Chair

Test and adjust your fittings as necessary until you have everything just right. Start to make the chair more secure by adding a strip of tape about ¼ the way up from the support beam, and wrap it around each of the branches. Take another strip or two of tape and secure the connections at the pointed ends of the seat and back. Attach a strip of tape to the front feet of the chair and connect them with the back leg. You can also place a strip between the front legs for some additional support as well.
Finally, take a few strips of tape and wrap them around each branch of the seat before stretching the tape across to the other side. Make these strips taut enough to support the weight of the heaviest person using the chair while keeping sagging to a minimum. You can expect to use anywhere from 3 to 10 strips to fashion the seat to your liking. Consider adding another layer of tape to cover the sticky-side of each of the strips on the chair. This will reinforce the strength of each of the strips while preventing the tape from sticking to itself if you decide to make the chair collapsible and portable.
Try this rudimentary project out for yourself and feel free to build on the idea to make something more suitable for your needs and purposes. The main thing to take away from this project is that you don’t need a lot of material to create a chair in the field, and it only takes a few minutes to put together.
