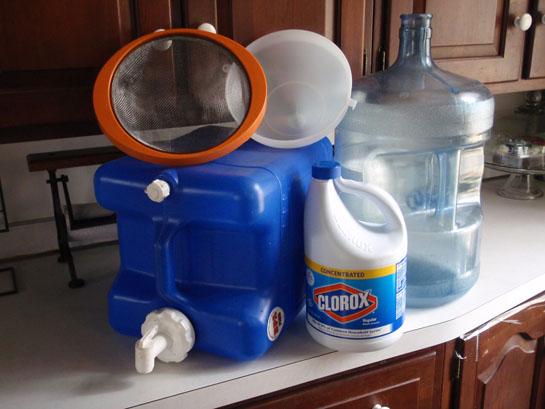
Alternate plans to provide your own utilities might seem like a complicated matter, but they don’t have to be. If, after an emergency, water is no longer running, there’s no need to die of thirst sitting in your house. Replicate the actions of your local water treatment facility and you’ll have safe water in no time. Here’s how to set up a small system for water disinfection and usage right on your kitchen countertop.
Get The Gear
For this setup, I’m using one of the commonly available blue water jugs with a spigot for my clean water reservoir, a 5-gallon water cooler jug as my disinfecting vessel, a jug of concentrated bleach, a large funnel, a stainless mesh strainer, a pack of coffee filters (the flat, round ones are best), a raw water collecting bucket, and a bowl of bleach water with a rag for disinfecting surfaces.
Find It
Before you can start disinfecting water, you’ve got to find some. Hit your backyard rain barrel, your nearby creek, or any other source of local fresh water. No matter how clean it may look, it should be considered contaminated by harmful organisms and in need of disinfection. Use your designated bucket to bring it back to the house.
Filter It
Your local water plant filters raw water in a variety of ways, and so should you. The raw water you collect might be muddy or dirty, or contain visible particles. A quick trick to filter it is to pour the water through a coffee filter or a clean cloth. For ease of use, I lay this filter in a kitchen strainer, and put that in a large funnel. I’ll pour the raw water from the bucket through this filter, into the water cooler jug. Let the water stand for several hours if it is muddy, and just pour the clearer water off the top. This will make disinfection much more effective. Remove the funnel and strainer when you’re done and put it in the bucket to avoid cross-contamination of wet surfaces.
Bleach It
Your next step is to carefully use ordinary household bleach to disinfect water. Read the labels before you start doling out chemicals. Ordinary bleach is 5.25% or 6% sodium hypochlorite, and it can be used for disinfection at a rate of 2 to 4 drops of ordinary chlorine bleach per quart of water. However, many bleach manufacturers have gone to a “concentrated” bleach solution, which is 8.25% sodium hypochlorite. If this is the case with your bleach, keep your minimum dose to 2 drops per quart, and lower the maximum dose to 3 drops per quart. As a rule, colder water needs a little more bleach than warm water, and muddier water needs more bleach than clear water.
Calculate and then double-check the numbers to figure out how many drops of bleach you’ll need for the volume of water you have. Once the bleach is added, shake the container for a minute. Use your cloth and bowl of bleachy water to wipe down the bottle exterior and any surfaces that may have had raw water splashed on them. Set the bottle in a dark place, or at least in the shade, for one hour. In that time, the bleach will kill any pathogens and make the water safe to drink. Pour it in the water carrier with the spigot, and you now have safe running water again. Use it wisely.
Whether there is a disaster, a water shortage, or the power went out on your electric well pump, follow these steps and you’ll be back on the path to safe water. Just be aware that chemical disinfection doesn’t remove toxins, fallout, etc. It just kills the living pathogens that would make you sick.
What would you do if the water stopped running? Tell us your plan in the comments…….
Thanks to Tim Macwelch at OutDoor Life

