In a previous article, we provided information on how to accurately perform CPR on adults. While some steps for giving CPR to an adult and child are similar, there are a few important differences. Specifically, there are four key differences between performing CPR on adults and performing CPR on children. The first difference involves when to phone your emergency response number (or dial 911). The second difference involves the amount of air for breaths. The third difference involves the depth of compressions. The last difference involves the number of hands for compressions. When you find yourself in a situation where you need to perform CPR on your child (or someone else’s child), it is extremely important to do 5 sets of 30 compressions and 2 breaths BEFORE leaving the child to phone your emergency response. If you recall, this is different from adult CPR where you phone first.
Amount of Air for Breaths: Breaths are crucial for children who are not responding. When you are giving breaths to children, you need to make sure to open the airway and to give breaths that make the chest rise, similar to adults. For smaller children, you will not need to use the same amount of air for breaths as for larger children or even adults. It is, however, important to keep in mind that each breath should still make the chest rise. Similar to performing CPR on adults, when performing CPR on children, it becomes very important to keep in mind that if the first breath does not go in, you will have to re-open the airway and try again.
Depths of Compression: When you push on a child’s chest, you need to press straight down 1/3 to 1/2 of the depth of the chest.
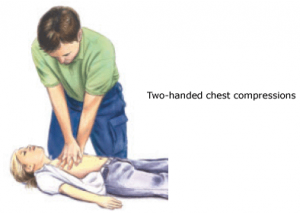
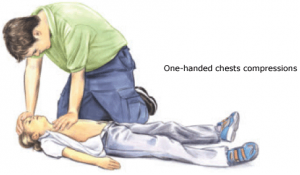
Number of Hands for Compressions: You may need to use only 1 hand for compressions for very small children. Whether you use 1 hand or both hands, it is important to push straight down 1/3 to 1/2 the depth of the chest.
Steps for Performing CPR for a Child:
1. Make sure the scene is safe
2. Make sure the victim is lying on his/her back on a firm, flat surface. If the victim is lying face-down, make sure to carefully roll the victim on his/her back.
3. Kneel at the victim’s side. Tap and shout to see if the victim responds.
4. If the victim does not respond, you need to yell for help.
- If someone comes, make sure to send that person to phone your emergency response number (or 911).
- If no one comes, stay with the child and start the steps of CPR.
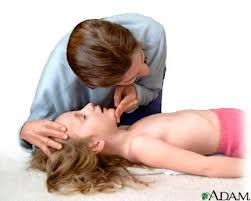
5. Open the airway with a head tilt-chin lift.
6. Check to see if the victim is breathing. Note: Make sure to take at least 5 seconds but no more than10 seconds.
- Put your ear next to the victim’s mouth and nose
- Look to see if the chest rises
- Listen for breaths
- Feel for breaths on your cheek
7. If the child is not breathing, give 2 breaths (1 second each). Watch for chest rise as you give each breath.
8. Quickly move or remove clothes from the front of the chest that will get in the way of doing compressions.
9. Give 30 compressions at a rate of 100 a minute and then give 2 breaths. After each compression, release pressure on the chest to let it come back to its normal position.
10. After 5 sets of 30 compressions and 2 breaths, if someone has not done this yet, phone your emergency response number (or 911).
11. After you answer all of the dispatcher’s questions, return to the child and start the steps of CPR.
12. Keep giving sets of 30 compressions and 2 breaths until the victim starts to move or until trained help takes over.
Infant CPR: Please keep in mind that infant CPR is for victims from birth to 1 year of age.
Actions for Compressions: please follow the below steps to give compressions to an infant.
1. Place the infant on a firm, flat surface. If possible, place the infant on a surface above the ground, such as a table. This makes it easier to perform CPR on the infant.
2. Quickly move or open clothes from the front of the chest that will get in the way of doing compressions.
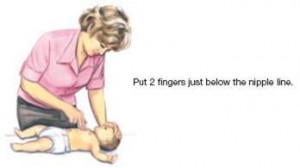
3. Put 2 fingers of one hand just below the nipple line. Do not put your fingers over the very bottom of the breastbone.
4. Press the infant’s breastbone straight down 1/3 to 1/2 the depth of the chest. Push hard and fast.
5. Repeat at a rate of 100 compressions a minute.
6. After each compression, release pressure on the chest to let it come back to its normal position.
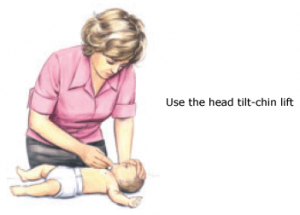
Open the Airway: When performing CPR on an infant, you must give the infant breaths that make the chest rise. Before giving breaths you must open the airway with the head tilt chin lift.
Performing the Head Tilt Chin Lift: When you open an infant’s airway, make sure to use the head tilt chin lift. When tilting an infant’s head, do not push it back too far because it may block the infant’s airway.
3 Steps for giving breaths:
1. Hold the infant’s airway open with a head tilt chin lift.
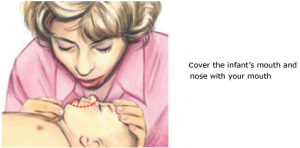
2. Take a normal breath and cover the infant’s mouth and nose with your mouth, creating an airtight seal.
3. Give 2 breaths (blow for 1 second each). Watch the chest rise as you give each breath.
NOTES:
- If your mouth is too small to cover the infant’s nose and mouth, put your mouth over the infant’s nose and give breaths through the infant’s nose. You may need to hold the infant’s mouth closed to prevent air from escaping through the mouth.
- If you give an infant a breath and it does not go in, you will need to re-open the airway with a head tilt chin lift before giving the second breath.
Knowing how to properly perform CPR on adults, children and infants is absolutely essential because you have the ability to save a life. Please read the articles and maybe even take a course on CPR to receive your certification. You can find out more information regarding CPR training courses at Red Cross. You never know when and if you’ll need it.
